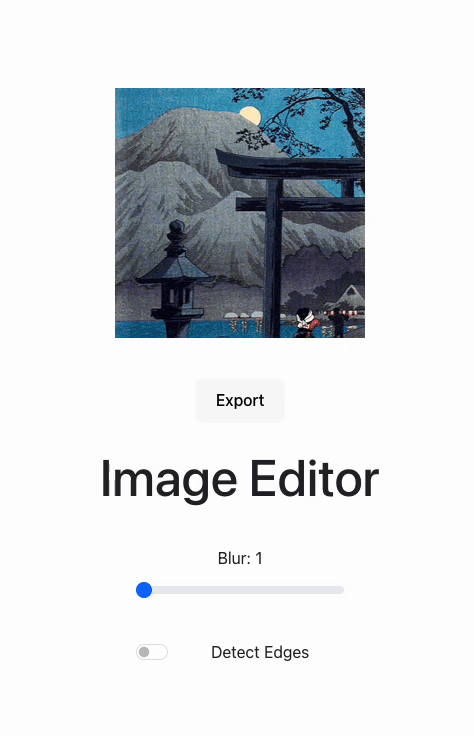
Try the final product out here.
In my quest to continue learning Rust, I built an image editor to show the benefits of delegating to a compiled, statically typed language. Maths-intensive operations on large images are usually either memory- or CPU-bound, and Rust’s lack of garbage collection overhead, along with rustc compiler optimisations, makes it a great language to use for this task. It also means all work can be performed client-side, providing a fast user experience without latency handing off to a server.
I did this the old-fashioned way - no vibe coding allowed!
Some background
The first problem I wanted to tackle is blurring. A straightforward blurring algorithm is Gaussian blur, which combines a Gaussian function with the image bytes to produce the blurring effect. The Gaussian function in its mathematical form is fairly complicated, but produces a “bell curve”, also known in statistics as the normal distribution.
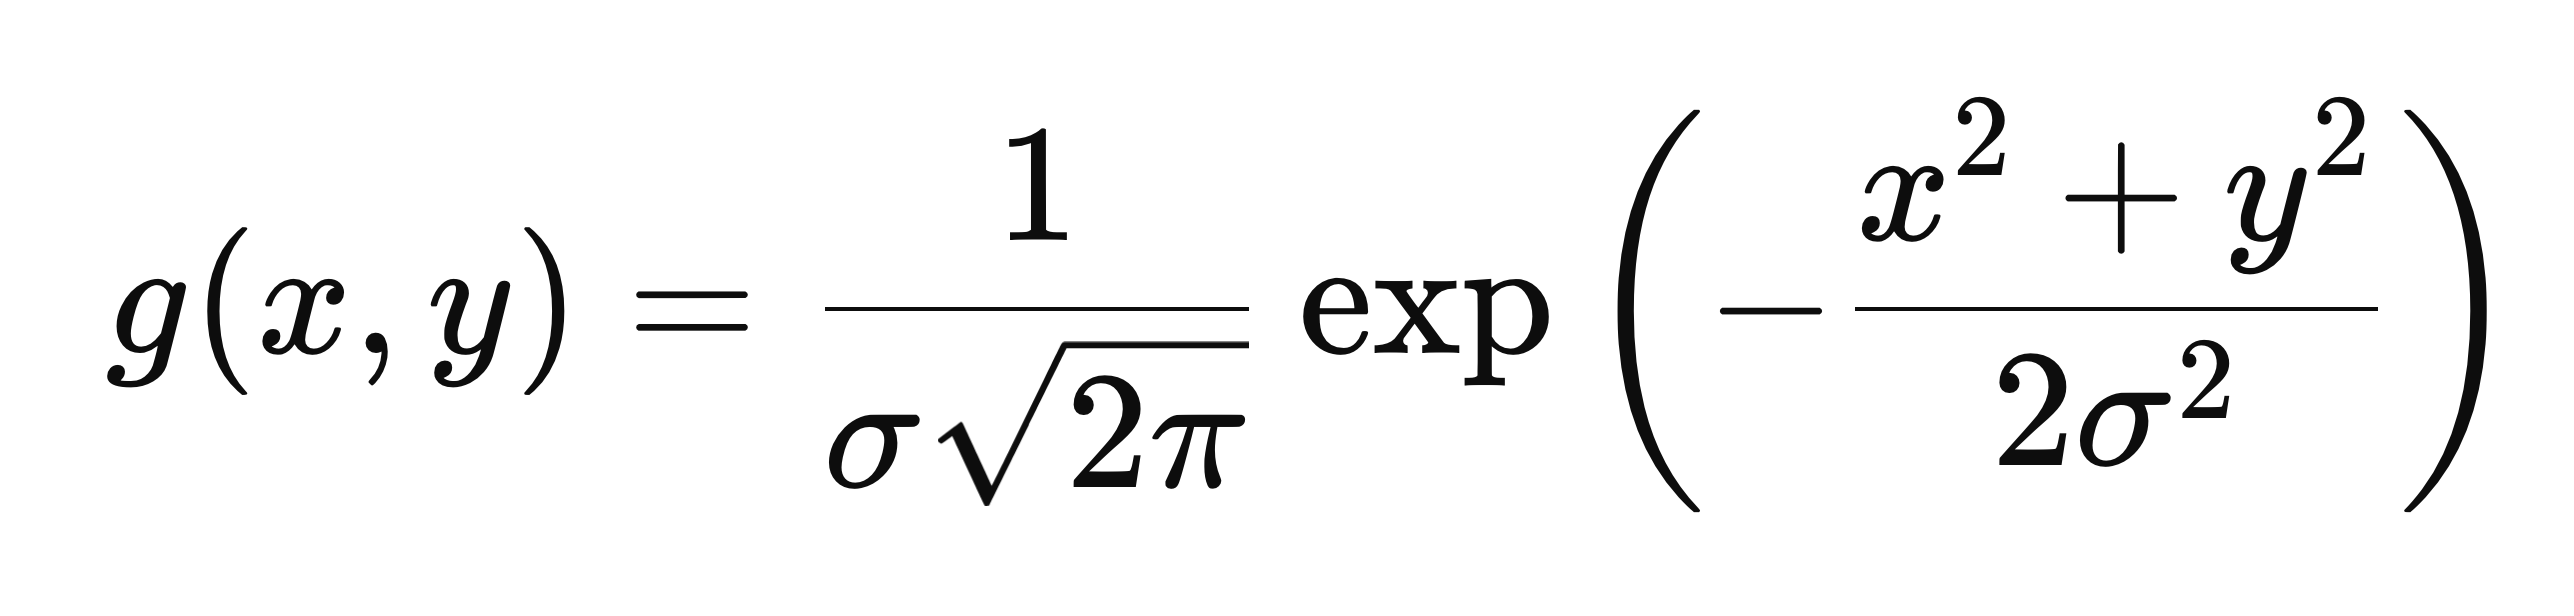
This is the Gaussian function in 2 dimensions, x and y, and it has one extra parameter σ (sigma) representing standard deviation of the distribution i.e. how spread out the curve is. This is the function visualised:
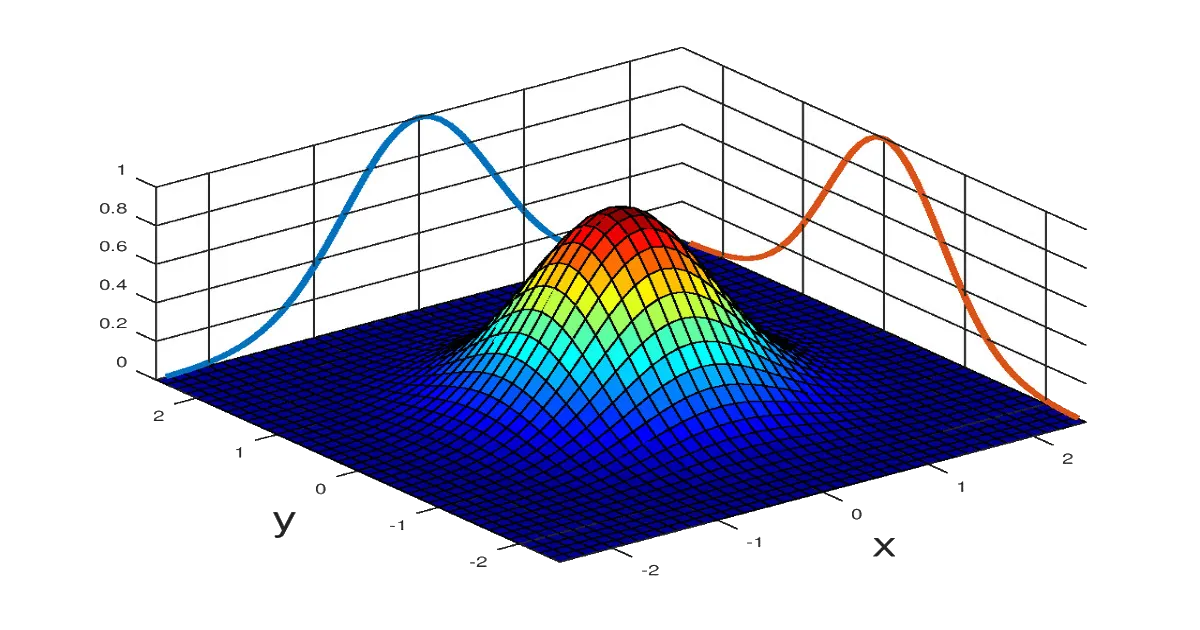
A 2D bell curve drawn with the 2D Gaussian function g(x, y). Source
For our blurring we need an image kernel, which is a small matrix we will slide over our original image to produce the blurring effect. Our blurring kernel will be a top-down slice of this Gaussian function.

A 3x3 Gaussian kernel.
Each pixel in the image is convolved with the kernel to produce the blurring effect. Convolution is an operation where one pixel of the input image, and its neighbours, are multiplied element-wise by the kernel and summed, to produce a single pixel in the output image. The kernel is usually 3x3.
You can think of the kernel as supplying the “weighting” of how much each pixel is combined with its neighbours to produce the output pixel. A larger σ value means the kernel is more “spread out”, therefore producing a stronger blurring effect.
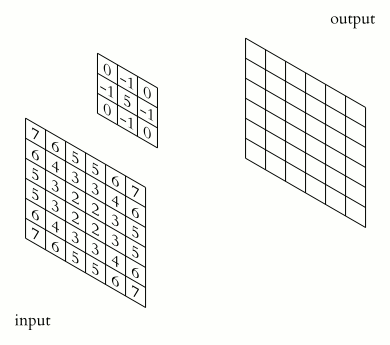
An image being convolved with a 3x3 kernel to produce a new image. Different kernels are used for different tasks - in this case the kernel is for image sharpening rather than blurring. Source
Fun fact: convolutions are the underlying principle of convolutional neural networks, which are the bedrock of generative AI image transforms!
There’s one tweak we should make to optimise the algorithm’s performance. Gaussian blurring with a 3x3 kernel requires 9 operations per pixel, as there are 9 multiplications and summations. However, it has a very convenient property: it’s a separable algorithm, meaning it can be decomposed into two passes of blurring with a 1-D kernel, in horizontal and vertical directions. The two passes approach means only 2×3 = 6 operations per pixel, so a 33% reduction in computation. In Big-O terms, we’ve turned an O(k2) algorithm into O(k).
Building the backend
In order to build our Rust library for web, we need to target wasm compilation. wasm, or WebAssembly is a portable low-level format that can be executed by every major browser engine. This can be done with the wasm-bindgen crate in Cargo, by tagging every function we want to expose to the frontend with the #[wasm_bindgen] macro:
/// Blurs an input image, given in bytes, by a blur factor. Blur factor must be
/// between 0 and 100. Returns a vector of bytes that is transferred in ownership back to JS.
#[wasm_bindgen]
pub fn gaussian_blur(original_image: &[u8], width: usize, height: usize, blur: u32) -> Vec<u8> {
    let kernel: Vec<f32> = one_d_gaussian_kernel(blur);

    let temp_image: Vec<u8> = horizontal_pass(original_image, &kernel, width, height);
    let output_image: Vec<u8> = vertical_pass(&temp_image, &kernel, width, height);

    output_image
}
This code can be built for wasm by running wasm-pack build --target web.
The image will be passed in as an array of unsigned bytes (u8 in Rust) and, importantly, it’ll be in RGBA format. That means every pixel in the image is actually 4 elements of our array, each a value between 0 and 255. The first 3 elements represent red, green and blue intensity, and the final is the “alpha” value representing transparency. The function takes in width and height, and we’ll also take in a blurring “factor” between 0 and 100.
Note that the function returns a fully-owned vector of bytes, not a reference to an existing vector or array. This is because the final output array will be transferred out of Rust memory into the JavaScript runtime, where it can then be manipulated safely.
Let’s look at the helper functions. Our Gaussian kernel helper should give us a kernel of length 3, so with a “radius” of 1.
fn one_d_gaussian_kernel(sigma: f32) -> Vec<f32> {
    let size: usize = 2 * KERNEL_RADIUS + 1;
    let mut kernel: Vec<f32> = vec![0.0; size];
    let two_sigma_squared: f32 = 2.0 * sigma * sigma;
    let mut sum: f32 = 0.0;

    for (i, kernel_value) in kernel.iter_mut().enumerate() {
        let pos: f32 = i as f32 - KERNEL_RADIUS as f32;
        *kernel_value = 1.0 / (sigma * (2.0 * PI).sqrt()) * (-(pos * pos) / two_sigma_squared).exp();
        sum += *kernel_value;
    }

    for k in kernel.iter_mut() {
        *k /= sum;
    }

    kernel
}
In the above code KERNEL_RADIUS is set to 1.
What’s nice about Rust is you can easily see which values are mutated with mut, versus which are constant. We also need to use a specific iter_mut() function to be able to iterate over a vector and get a mutable reference each time, as the standard iter() is extra-safe and only produces immutable references. I’m using single-precision floating point f32 rather than the double-precision f64 to prioritise speed over accuracy.
Let’s look at the convolution helpers, for example the horizontal pass. We need to iterate over the image and convolve each pixel with the kernel. Remember each pixel is a group of 4 elements of the array.
fn horizontal_pass(
    original: &[u8],
    kernel: &[f32],
    width: usize,
    height: usize,
) -> Vec<u8> {
    let mut output: Vec<u8> = vec![0; original.len()];

    for x in 0..width {
        for y in 0..height {
            let mut r: f32 = 0.0;
            let mut g: f32 = 0.0;
            let mut b: f32 = 0.0;
            let mut a: f32 = 0.0;

            for (k, kernel_value) in kernel.iter().enumerate() {
                let offset: usize = k - KERNEL_RADIUS;
                let x_to_convolve: usize = (x + offset).clamp(0, width - 1);
                let idx_to_convolve: usize = (y * width + x_to_convolve) * NUM_CHANNELS;

                r += original[idx_to_convolve] as f32 * kernel_value;
                g += original[idx_to_convolve + 1] as f32 * kernel_value;
                b += original[idx_to_convolve + 2] as f32 * kernel_value;
                a += original[idx_to_convolve + 3] as f32 * kernel_value;
            }

            let idx_to_update: usize = (y * width + x) * NUM_CHANNELS;

            output[idx_to_update] = r as u8;
            output[idx_to_update + 1] = g as u8;
            output[idx_to_update + 2] = b as u8;
            output[idx_to_update + 3] = a as u8;
        }
    }

    output
}
NUM_CHANNELS is set to 4. Since the image is an array, the pixel (x, y) is at position (y × width + x) × NUM_CHANNELS in the array.
I’m also using .clamp() here to avoid going over the bounds of the image. Each pixel is convolved with its neighours to the left and right to produce an output pixel. For pixels at the edge of the image, when trying to access neighbours outside the bounds we will simply “clamp” to either column 0 or column width-1.
The vertical convolution is very similar to the above, just combining each pixel with its vertical neighbours instead of horizontal, and clamping with row 0 and height-1.
You can see the full code here.
Building the frontend

For the UI I created a React app with Vite. The app displays a sample image, which you can click to replace with your own, and includes a blur slider from 0 to 100. The image is rendered to a <canvas>, and is continuously updated as the slider is moved with the help of React state and useEffect. You can also export the blurred image to your filesystem.
The wasm build of Rust code produces a wasm.js file, which can be imported into React components to interact with wasm code.
Improving performance
After testing out my app with images of different sizes, I made some enhancements to reduce latency in the blurring.
The first was using a web worker in the frontend to handle interaction with wasm code. A web worker is a background thread that can be assigned tasks to run, to avoid blocking the main UI thread. Having the worker call into wasm frees up the UI thread to respond to user input again, leading to snappier user experience.
The worker is activated by a React component sending a “message” telling it to start some behaviour. For example, to instruct the worker to blur an image we can send a message like this:
imageWorker.postMessage({
  type: "blur",
  originalImage: imageData,
  width: canvas.width,
  height: canvas.height,
  blur: blurFactor
});
The second improvement I made is to optimise these web worker messages. With the above implementation, the full image data will be sent to the worker on every blur call. If the user is moving the slider between 0 and 100, that means the image data is being transferred to the worker 100x, once for each blur factor.
This is hugely inefficient, so I split up the worker calls into an “initial” message, that will transfer the initial image and dimensions, and a “blurring” message that just transfers the new blur factor. This means the image isn’t needlessly being transferred between threads more than it needs to.
// Called when webpage initially loads
imageWorker.postMessage({
  type: "init",
  originalImage: imageData,
  width: canvas.width,
  height: canvas.height,
});
// Called whenever slider is moved
imageWorker.postMessage({
type: "blur",
blurFactor: blurFactor
});Some final notes
This was a fun exercise in using interoperability between Typescript and Rust code to build a great user experience. I’ve since fleshed out the editor to perform edge detection and object detection, which deserve their own posts to do them justice!
The full code is available at github.com/fawazshah/image-editor.